Uncategorized
How to Clean K&N Air Filter: Complete Step-by-Step Guide for 2026

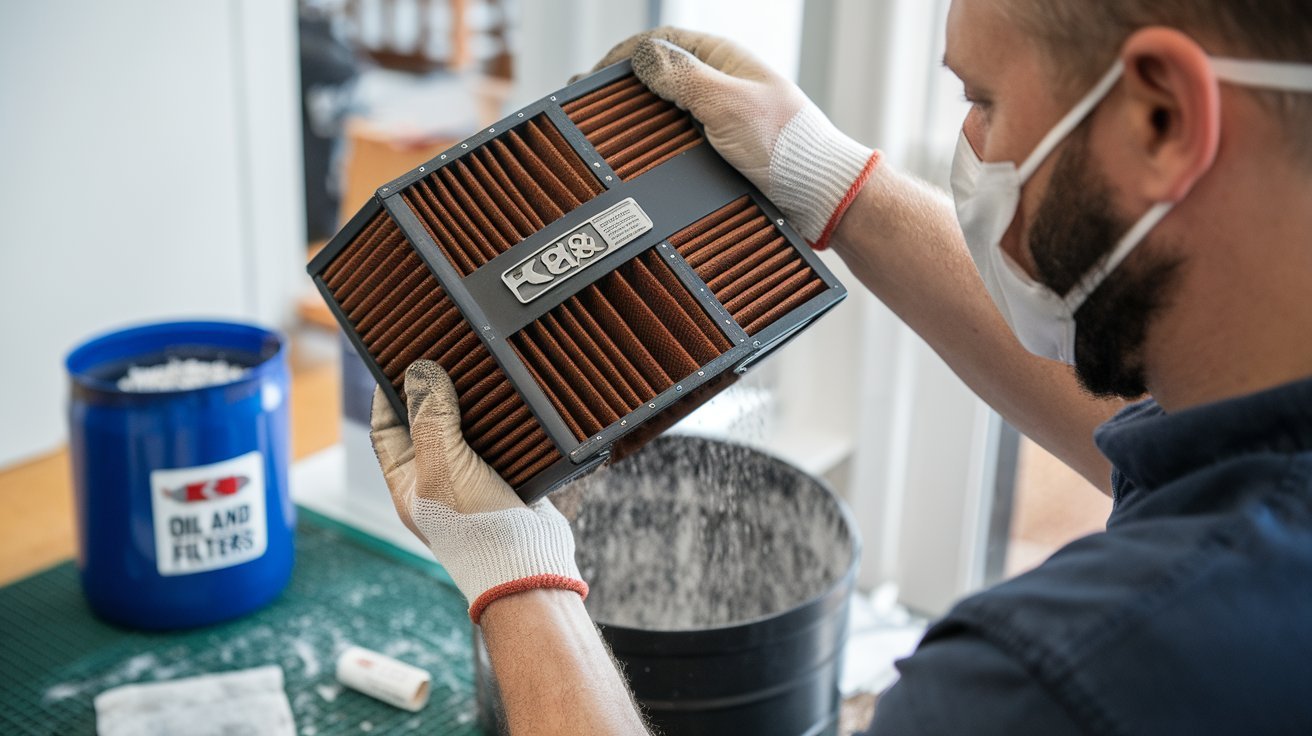
Learning how to clean K&N air filter is important for maintaining the filter’s airflow and keeping a reusable filter in good condition. Unlike a conventional disposable paper filter, a K&N reusable cotton-gauze High-Flow Air Filter is designed to be cleaned, dried, re-oiled and reused rather than thrown away after becoming dirty.
The process is straightforward, but the correct procedure matters. K&N recommends using its appropriate filter cleaner and filter oil, rinsing with cool, low-pressure water, allowing the filter to dry naturally and applying the correct amount of oil before reinstalling it.
The instructions below focus primarily on a K&N oiled cotton-gauze engine air filter. K&N also makes DRYFLOW, cabin, home HVAC and other filter types, and those products have different servicing procedures.
When Should You Clean a K&N Air Filter?
One of the most common mistakes is cleaning a reusable filter simply because it looks slightly dirty. Visual inspection is more useful than following an arbitrary cleaning schedule.
K&N says replacement High-Flow filters installed in factory air boxes can generally go up to 50,000 miles under normal highway driving conditions, while larger filters used with K&N intake systems can go up to 100,000 miles under normal highway conditions. Dusty, off-road or otherwise severe environments can require substantially more frequent servicing.
K&N recommends visually inspecting an engine air filter approximately every 25,000 miles. One indicator is whether the filter’s wire screen remains visible. When the screen is no longer visible in an area because of accumulated dirt, the filter should be cleaned.
Therefore, we should consider the vehicle’s driving environment, dust exposure, mileage and the filter’s actual condition rather than automatically cleaning it at every oil change.
What You Need to Clean a K&N Air Filter
Before starting, we should gather everything required so the filter can be serviced without rushing the drying or oiling stages.
For a traditional K&N High-Flow cotton air filter, the basic supplies include:
- K&N air filter cleaner
- K&N air filter oil
- A source of cool, low-pressure water
- A clean work area
- A clean towel for handling the filter and removing excess water
K&N’s Recharger cleaning kits are specifically designed for this process. The company’s official instructions identify the appropriate cleaner and oil as part of the approved servicing procedure.
We should avoid improvising with aggressive household chemicals, solvents or high-pressure water. The filter media needs to remain intact, and excessive water pressure can damage filter material.
It is also important to identify the exact type of K&N filter before cleaning it. DRYFLOW filters are not serviced by the same oiling procedure used for traditional oiled cotton filters. K&N specifically provides separate instructions for DRYFLOW products.
Step 1: Remove the K&N Air Filter
First, turn off the vehicle and allow the engine compartment to cool if necessary. Locate the engine air-filter housing and carefully remove the K&N filter.
Before removing it, we should note how the filter is positioned and sealed. The filter must be correctly seated when it goes back into the airbox. A poorly seated filter can allow unfiltered air to bypass the filter.
Once removed, gently tap the filter to release loose dirt and debris. K&N specifically recommends handling the filter carefully and lightly tapping off loose contamination before applying cleaner.
This is also a good opportunity to inspect the airbox. If dirt has accumulated inside the housing, carefully clean the housing without allowing debris to enter the intake tract.
Step 2: Apply K&N Filter Cleaner
The next stage is applying K&N Power Kleen or the appropriate K&N filter cleaner.
Spray the cleaner liberally over both sides of the filter. K&N instructs users to allow the cleaner to soak for approximately 10 minutes so it can loosen dirt trapped in the filter media. The cleaner should not be allowed to dry on the filter.
For a heavily contaminated filter, a second cleaning cycle may be necessary. K&N notes that extremely dirty filters can require additional cleaning, so we should not try to force stubborn dirt out by using excessive water pressure.
The goal is to allow the cleaner to do the work rather than aggressively scrubbing the delicate filter material.
Step 3: Rinse the Filter Correctly
After the cleaner has soaked for the recommended period, rinse the filter using cool, low-pressure water.
This direction is important: K&N instructs users to rinse from the clean side outward so that dirt is flushed away from the filter media rather than being pushed deeper into it. Continue rinsing until the water runs clear and traces of cleaner and dirt have been removed.
We should avoid using a pressure washer, high-pressure nozzle or extremely hot water. Excessive pressure can damage the filter’s construction.
If dirt remains after the first rinse, repeat the cleaner and rinse process. Patience is safer than aggressive scrubbing.
Step 4: Let the K&N Filter Dry Naturally
Once the filter has been thoroughly rinsed, gently shake off excess water.
The filter must then be allowed to dry naturally. K&N specifically states that oil should not be applied until the air filter is completely dry.
We should not use a hair dryer, heat gun, oven or other high-temperature source to accelerate drying. Natural air drying avoids unnecessary heat exposure and gives the filter media time to dry evenly.
Drying time depends on temperature, humidity, airflow and the filter’s size. The important point is not to rush this stage. Never oil a wet filter.
Step 5: Re-Oil the K&N Air Filter
Once the filter is completely dry, it is time to apply K&N air filter oil.
For the traditional K&N cotton-gauze filter, apply oil evenly along the crown of each filter pleat. K&N’s instructions recommend allowing the oil to wick for approximately 20 minutes. Afterward, inspect the filter and touch up areas that appear insufficiently oiled until the filter has a uniform appearance.
The key is to use the correct amount of oil. More oil does not automatically mean better filtration.
K&N specifically warns against over-oiling. If oil is dripping from the filter, it should be allowed to sit until dripping stops, with excess oil removed from the filter frame as appropriate.
We should use only the oil specified for the particular K&N filter. The amount required can vary according to filter size and part number.
Step 6: Reinstall the Filter Correctly
After cleaning, drying and oiling are complete, reinstall the K&N filter into its original housing.
Make sure the filter sits squarely and securely against its sealing surface. Reinstall the airbox cover and all clamps, screws or retaining hardware that were removed.
Before starting the engine, check the intake system for loose connections. A properly installed filter should form a reliable seal so that incoming air passes through the filter rather than around it.
After installation, start the vehicle and listen for unusual intake noises, air leaks or loose components. If anything sounds abnormal, shut the engine off and inspect the installation before driving.
Common K&N Air Filter Cleaning Mistakes to Avoid
Several mistakes can reduce the effectiveness or lifespan of a reusable filter.
Do not use high-pressure water. K&N specifies cool, low-pressure rinsing for its oiled cotton High-Flow filters.
Do not let the cleaner dry on the filter. The cleaner should be allowed to soak for the recommended period and then rinsed away.
Do not oil a wet filter. Natural drying should be completed before the oiling stage.
Do not over-oil the filter. Excess oil can migrate away from the filter and create problems. K&N specifically advises against saturating the filter.
Do not use the wrong servicing procedure. K&N’s DRYFLOW filters, cabin filters and home HVAC filters use different maintenance procedures.
How to Clean K&N Air Filter in 2026: Quick Checklist
For a traditional oiled K&N engine air filter, the complete process is:
- Remove the filter from the airbox or intake system.
- Tap off loose dirt and debris carefully.
- Apply K&N filter cleaner to both sides.
- Let the cleaner soak for about 10 minutes, without allowing it to dry.
- Rinse with cool, low-pressure water from the clean side outward.
- Continue rinsing until the water runs clear.
- Shake off excess water.
- Allow the filter to dry naturally and completely.
- Apply K&N filter oil evenly along the pleats.
- Allow the oil to wick for approximately 20 minutes.
- Inspect the filter and correct any visibly under-oiled areas.
- Reinstall the filter securely in the airbox or intake.
Following the manufacturer’s procedure is the simplest way to preserve a reusable K&N filter. With proper servicing, these filters can be cleaned and reused rather than routinely discarded, while the correct cleaning interval depends on the filter type and the conditions in which it operates.
For 2026, the most important takeaway is simple: clean only when the filter needs servicing, use the correct K&N products, rinse gently, dry completely and avoid over-oiling. This approach keeps the reusable filter ready for continued service while reducing the risk of damaging the filter media or compromising its installation.

Temperature conversion is a common requirement in cooking, science, education, travel, and everyday life. One of the most frequently searched temperature conversions is 180 C to F, especially among people following recipes from different countries. Since many nations use the Celsius scale while others rely on Fahrenheit, understanding how to convert temperatures accurately is essential for achieving the desired results.
Whether you are baking a cake, roasting vegetables, preparing a pizza, or simply learning about temperature measurements, knowing how to convert 180°C to Fahrenheit can save time and prevent mistakes. In this comprehensive guide, we will explore the conversion formula, practical applications, cooking uses, differences between temperature scales, and helpful conversion tips.
What Is 180 C to F?
The conversion of 180 degrees Celsius to Fahrenheit is:
180°C = 356°F
This means that when an oven recipe calls for 180 degrees Celsius, you should set a Fahrenheit-based oven to approximately 356 degrees Fahrenheit.
In practical cooking situations, most ovens are adjusted to 350°F or 355°F, depending on available settings.
Quick Answer
| Celsius | Fahrenheit |
|---|---|
| 180°C | 356°F |
This conversion is one of the most commonly used because many international recipes recommend baking at 180°C.
Understanding the Celsius to Fahrenheit Formula
To convert Celsius to Fahrenheit, use the following formula:
°F = (°C × 9/5) + 32
Let’s calculate 180°C step by step.
Step 1
Multiply Celsius by 9:
180 × 9 = 1620
Step 2
Divide by 5:
1620 ÷ 5 = 324
Step 3
Add 32:
324 + 32 = 356
Final Result
180°C = 356°F
This formula works for any Celsius temperature and is widely used in science, engineering, education, and everyday applications.
Why 180°C Is One of the Most Popular Cooking Temperatures
If you enjoy baking or cooking, you have probably seen 180°C mentioned frequently in recipes. This temperature is often considered a standard baking setting because it provides balanced heat suitable for many dishes.
Common foods baked at 180°C include:
- Cakes
- Cookies
- Muffins
- Bread
- Brownies
- Roasted vegetables
- Lasagna
- Casseroles
- Chicken dishes
- Pizza
The reason 180°C is so popular is that it cooks food evenly without being excessively hot. It allows ingredients to bake thoroughly while minimizing the risk of burning.
Many professional chefs and home cooks consider 180°C one of the most versatile oven temperatures available.
Celsius vs Fahrenheit: Understanding the Difference
To fully understand the conversion of 180 C to F, it helps to know how the two temperature scales differ.
Celsius Scale
The Celsius scale is used by most countries worldwide.
Key reference points:
- Water freezes at 0°C
- Water boils at 100°C
The Celsius system is based on the metric system, making it simple and easy to understand.
Fahrenheit Scale
The Fahrenheit scale remains widely used in the United States and a few other regions.
Key reference points:
- Water freezes at 32°F
- Water boils at 212°F
Because the Fahrenheit scale uses smaller increments, some people feel it provides more detailed temperature measurements for everyday use.
Why Both Scales Exist
Different countries adopted different measurement systems over time. As a result, international recipes, weather forecasts, and scientific information often require temperature conversions.
Understanding both scales helps eliminate confusion and improves communication across regions.
Common Cooking Temperatures Around 180°C
When working with recipes, it is helpful to know temperatures close to 180°C.
Temperature Conversion Chart
| Celsius | Fahrenheit |
|---|---|
| 160°C | 320°F |
| 170°C | 338°F |
| 180°C | 356°F |
| 190°C | 374°F |
| 200°C | 392°F |
| 220°C | 428°F |
This chart can be useful when adjusting recipes or compensating for oven limitations.
Many home ovens do not display 356°F exactly, so cooks often round to the nearest available setting.
Using 180°C in Baking and Roasting
The temperature of 180°C is considered a moderate oven setting. It works well for a wide variety of cooking methods.
Baking Cakes
Most sponge cakes, butter cakes, and layered cakes bake successfully at 180°C.
The moderate heat allows the batter to rise evenly while developing a soft texture.
Baking Cookies
Cookies often bake beautifully at 180°C because the temperature creates a balance between crisp edges and soft centers.
Roasting Vegetables
Vegetables such as carrots, potatoes, broccoli, and cauliflower roast effectively at this temperature.
The heat promotes caramelization while preserving moisture.
Cooking Chicken
Many chicken recipes recommend 180°C because it allows the meat to cook thoroughly without drying out.
Baking Bread
Several bread recipes use 180°C during part or all of the baking process to achieve a golden crust and fully cooked interior.
Its versatility explains why 180°C remains one of the most frequently used cooking temperatures worldwide.
How Oven Types Affect 180°C Cooking
Not all ovens perform exactly the same way. Understanding your oven type can help achieve better results when cooking at 180°C.
Conventional Ovens
Traditional ovens heat food using top and bottom heating elements.
For conventional ovens, recipes calling for 180°C typically require no adjustments.
Fan-Assisted Ovens
Fan ovens circulate hot air throughout the cooking chamber.
Because airflow improves heat distribution, many cooks reduce temperatures slightly.
A recipe calling for 180°C may sometimes be adjusted to:
- 160°C to 170°C in a fan oven
Always consult your appliance manual for specific recommendations.
Gas Ovens
Gas ovens may use temperature markings rather than exact Celsius or Fahrenheit values.
For many gas ovens:
- 180°C corresponds approximately to Gas Mark 4
Understanding these differences can improve consistency and cooking accuracy.
Practical Situations Where 180 C to F Conversion Is Useful
Temperature conversion is valuable in many real-world situations beyond cooking.
International Recipes
Recipes from Europe, Australia, and much of Asia often use Celsius.
Readers in the United States frequently need Fahrenheit conversions.
Culinary Education
Cooking students often learn both measurement systems.
Travel
People moving between countries may encounter different temperature scales in ovens and appliances.
Scientific Studies
Educational and research environments frequently require temperature conversions.
Product Instructions
Kitchen appliances, food packaging, and instructional guides may display temperatures using either scale.
Knowing how to convert temperatures accurately helps avoid misunderstandings and mistakes.
Tips for Remembering 180°C to Fahrenheit
Many people prefer memorizing common cooking conversions rather than calculating them every time.
Here are some helpful techniques.
Memorize the Exact Conversion
Remember:
180°C = 356°F
Use the Rounded Value
Many cooks simply remember:
180°C ≈ 350°F
Although slightly lower than the exact conversion, this approximation works well for most recipes.
Keep a Conversion Chart Nearby
Many kitchens display quick-reference temperature charts.
Use Smartphone Apps
Numerous cooking and conversion apps provide instant calculations.
Learn Common Cooking Benchmarks
Remembering a few frequently used temperatures can simplify everyday cooking.
Examples:
- 160°C = 320°F
- 180°C = 356°F
- 200°C = 392°F
These benchmarks make conversions faster and easier.
Why Accurate Temperature Conversion Matters
Temperature affects every stage of cooking and baking. Even small differences can influence the final result.
Accurate conversions help:
Prevent Undercooking
Food that is cooked at too low a temperature may not reach proper doneness.
Avoid Burning
Excessively high temperatures can cause burning before the interior is fully cooked.
Maintain Texture
Temperature influences texture, moisture, and structure.
Improve Consistency
Reliable conversions help produce consistent results every time.
Follow Professional Recipes Correctly
Many professional recipes rely on precise temperature settings.
Understanding temperature conversions allows cooks to reproduce recipes more accurately regardless of location.
Conclusion
The conversion of 180 C to F is one of the most commonly used temperature calculations, particularly in cooking and baking. The exact conversion is 356°F, although many recipes and cooks round this to 350°F for convenience. Understanding how to perform this conversion and when to use it can significantly improve cooking results and reduce confusion when working with international recipes.
Whether you are baking cakes, roasting vegetables, preparing family meals, or simply learning about temperature measurement systems, knowing that 180°C equals 356°F is a practical and valuable piece of knowledge. By understanding the relationship between Celsius and Fahrenheit, you can confidently follow recipes from around the world and achieve more consistent culinary success.
Frequently Asked Questions
What is 180 C in Fahrenheit?
180 degrees Celsius equals 356 degrees Fahrenheit.
Is 180°C the same as 350°F?
Not exactly. The precise conversion is 356°F, but many recipes round it to 350°F.
How do you convert 180 C to F?
Use the formula:
°F = (°C × 9/5) + 32
Applying the formula gives:
180°C = 356°F
Why do recipes often use 180°C?
180°C is considered a moderate baking temperature suitable for many cakes, cookies, breads, and roasted dishes.
What gas mark is 180°C?
180°C is approximately Gas Mark 4.
Is 180°C good for baking?
Yes. It is one of the most commonly used and versatile baking temperatures.
What is 200°C in Fahrenheit?
200°C equals 392°F.
Which countries use Celsius?
Most countries worldwide use the Celsius temperature scale, while the United States primarily uses Fahrenheit.

How Many of Me Are There? A Complete Guide to Finding People Who Share Your Name in 2026

Lakiha Spicer: Biography, Age, Family, Mike Tyson, Career and Life in 2026

Thomas Boone Quaid: Biography, Family, Medical History, Education, and Life in 2026

Playing Game Site PlayBattleSquare (2026): Complete Guide to Features, Gameplay, Community, and Gaming Experience

Is Mychael Schnell Married? (2026) Everything We Know About the Journalist’s Personal Life, Career, and Background

Isaac Ortega: Biography, Career, Achievements, and Growing Influence
 Gaming3 months ago
Playing Game Site PlayBattleSquare (2026): Complete Guide to Features, Gameplay, Community, and Gaming Experience
- Celebrity3 months ago
Is Mychael Schnell Married? (2026) Everything We Know About the Journalist’s Personal Life, Career, and Background
- Celebrity3 months ago
Isaac Ortega: Biography, Career, Achievements, and Growing Influence
- Blog3 months ago
The #Thriftyevents.net: A Complete Guide to Affordable Event Planning and Budget-Friendly Celebrations in 2026
- Technology3 months ago
Slylar Box: A Complete Guide to Features, Benefits, Uses, and What You Should Know
- Entertainment3 months ago
Buffstreams: Everything You Need to Know About the Popular Sports Streaming Platform
- Food2 months ago
Best Calçots with Romesco Near Me: The Ultimate 2026 Guide to Finding Authentic Catalan Grilled Onions
- Fashion3 months ago
www.redandwhitemagzcom: A Complete Guide to the Digital Magazine Platform in 2026